Webhuk uses a consistent user interface to present data and control elements to the user. Data is the business information stored in the back-end database that is displayed in the browser as per the user's actions. For example, Webhuk may show a list of sales funnels when a user chooses the "View Sales Funnels" control element. A control element is provided to the user to trigger an action. It may be a menu item, a button or a link that a user can click to instruct Webhuk to perform a certain task.
The major components of the user interface are described in the image below:
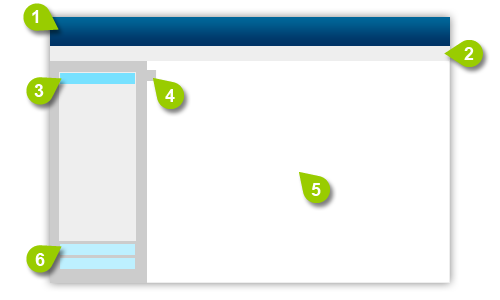
- Header: Shows your business name, the user who has logged in, a clock and search box.
- Main Menu: The Webhuk main drop-down menu system is just below the header.
- Sidebar Accordion (open): Can be opened by clicking on the title.
- Sidebar Visibility Control: Clicking on this when the sidebar is visible will hide the sidebar. When the sidebar is not visible, clicking on this will show the sidebar. This is very useful when Webhuk is being used on lower resolution screens such as 1024x768. Hiding the sidebar increases the amount of content space (5).
- Content Space: Business data that is retrieved is displayed here; So are forms requiring user input.
- Sidebar Accordion (closed): Clicking on a closed accordion title will open it (and close the previously open accordion).
Webhuk Main Menu
All the features of Webhuk are exposed through the main menu. The main menu is displayed in the header section just below the business name & the clock on the top-right. Move your mouse to any of the menu headings to drop-down a list of menu items. Clicking on any menu heading will take the user to that section's landing page. For example, clicking on the heading "Payments" will take the user to Webhuk's Payment section's landing page, which is a list of all payments that have been entered into the system.
In addition to the menu headings, there are two special components in the main menu as shown below:

- This is the Administration menu. Its contents are accessible only by site administrators or when a particular role is given administration access to some or all of Webhuk's administrative functionality, such as creating new Branches, adding new Users, adding new Shipping Regions, modifying Configuration variables etc.,
- This checkbox turns on or off Webhuk's screen-tip system. Its turned off by default. The screen-tip system is useful when there are forms on the screen awaiting user input, but the user is unsure of what to enter. To get more information on a form item, a user first checks this box on. As soon as this checkbox is on, Webhuk shows the screen-tip icon on all the on-screen form fields. A user can click on the screen-tip icon next to whichever form item he/she wants to get more information on to pop-up a screen-tip from the server.